|
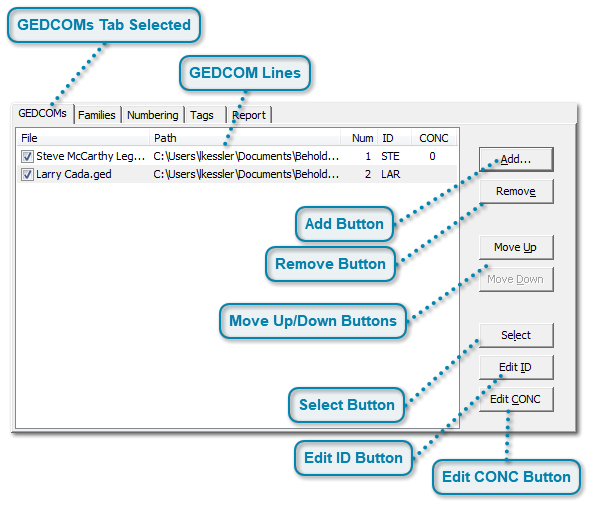
 GEDCOMs Tab SelectedThe GEDCOMs tab will appear to be selected when you are on the GEDCOMs page.
| |
 GEDCOM Lines
Behold can load one or more GEDCOM file at one time. Each file has its own line on this page. Each line includes:
-
A file selection box. A checkmark in the box indicates the file will be included in the Everything Report. An empty box means it will not be included in the Everything Report. This is a quick way to exclude the information that makes it easy to add it again later. You can select/deselect by: Clicking on the box with your mouse, activating the line and pressing the space key, or activating the line and pressing the Select button. -
-
-
Num: A sequential numbering of the selected files. -
ID: A short identifier you can assign to easily recognize which GEDCOM file it is. You can edit this identifier by clicking on it with your mouse, or by activating the line and pressing the Edit ID button. The GEDCOM ID is used on the Organize Families page to indicate which GEDCOM each family comes from. -
CONC: An indicator of how to handle the Concatenate tag in this GEDCOM file. A zero "0" will add zero spaces between CONC lines. A one "1" will add one space between lines. A blank indicates Behold will try to decide which method to use the next time you load this file, and will fill in its guess (0 or 1) after you load the file. If Behold is not correct, you can change the value here by clicking on it with your mouse, or by activating the line and pressing the Edit CONC button. Behold's File Information explains more about the inconsistent implementation of the CONC tag.
To activate a line, click on it with your mouse. Once a line is activated, you can use the mouse or the up and down arrow keys to change the activated line.
| |
 Add ButtonThis will bring up a standard Open File dialog that will let you select one or more GEDCOM files to add one to the GEDCOM selections list.
| |
 Remove ButtonWhen you've activated a GEDCOM line, you can completely remove it from the list with this button.
Note that this is very different than deselecting a line, which leaves the GEDCOM file in the list, but just does not display it in the Everything Report.
| |
 Move Up/Down ButtonsWhen a line is activated, these buttons will move the GEDCOM file up or down one line. When you move a GEDCOM, the GEDCOMs involved in the move will switch numbers.
This is used mainly to number the GEDCOMs in the order you want. A few items in the Everything Report (such as File Information) are displayed in the GEDCOM order. But most of the ordering in the GEDCOM file is based on families and is controlled by the order of the families on the Organize Families page.
| |
 Select ButtonWhen a line is activated, this button will select or deselect the GEDCOM for that line. You'll notice the effect in the checkbox for that line. Selected GEDCOMs are included in the Everything Report. Unselected GEDCOMs are not.
| |
 Edit ID ButtonWhen a line is activated, this button puts the ID for the line into edit mode.
| |
 Edit CONC ButtonWhen a line is activated, this button puts the CONC for the line into edit mode.
| |
|
|